基础知识


《中华人民共和国个人信息保护法》2021年11月1日施行
《网络安全法》2017.1.1
《国家安全法》2020.6.1
《数据安全法》2021.9.1


Snort–基于规则的误用检测


ssh无法抵御中间人攻击和拒绝服务攻击
SYN/ACK 扫描,向某个主机端口发送SYN/ACK数据包,若端口未开放返回RST;若端口开放,不返回信息。
设备冗余,即设备之间相互备份

“广外女生”超级管理技术DDos
灰鸽子、网络神偷:端口反向连接
交换机和路由器支持AAA认证:认证,授权,记账

各类扫描:


 缓冲区溢出
缓冲区溢出

 冰河:7626、BackOriffice:54320


CIDF

特洛伊木马利用端口反向连接技术
SQL SERVER 开发的服务端口号1433
勒索病毒常禁用445端口
Blaster 135端口

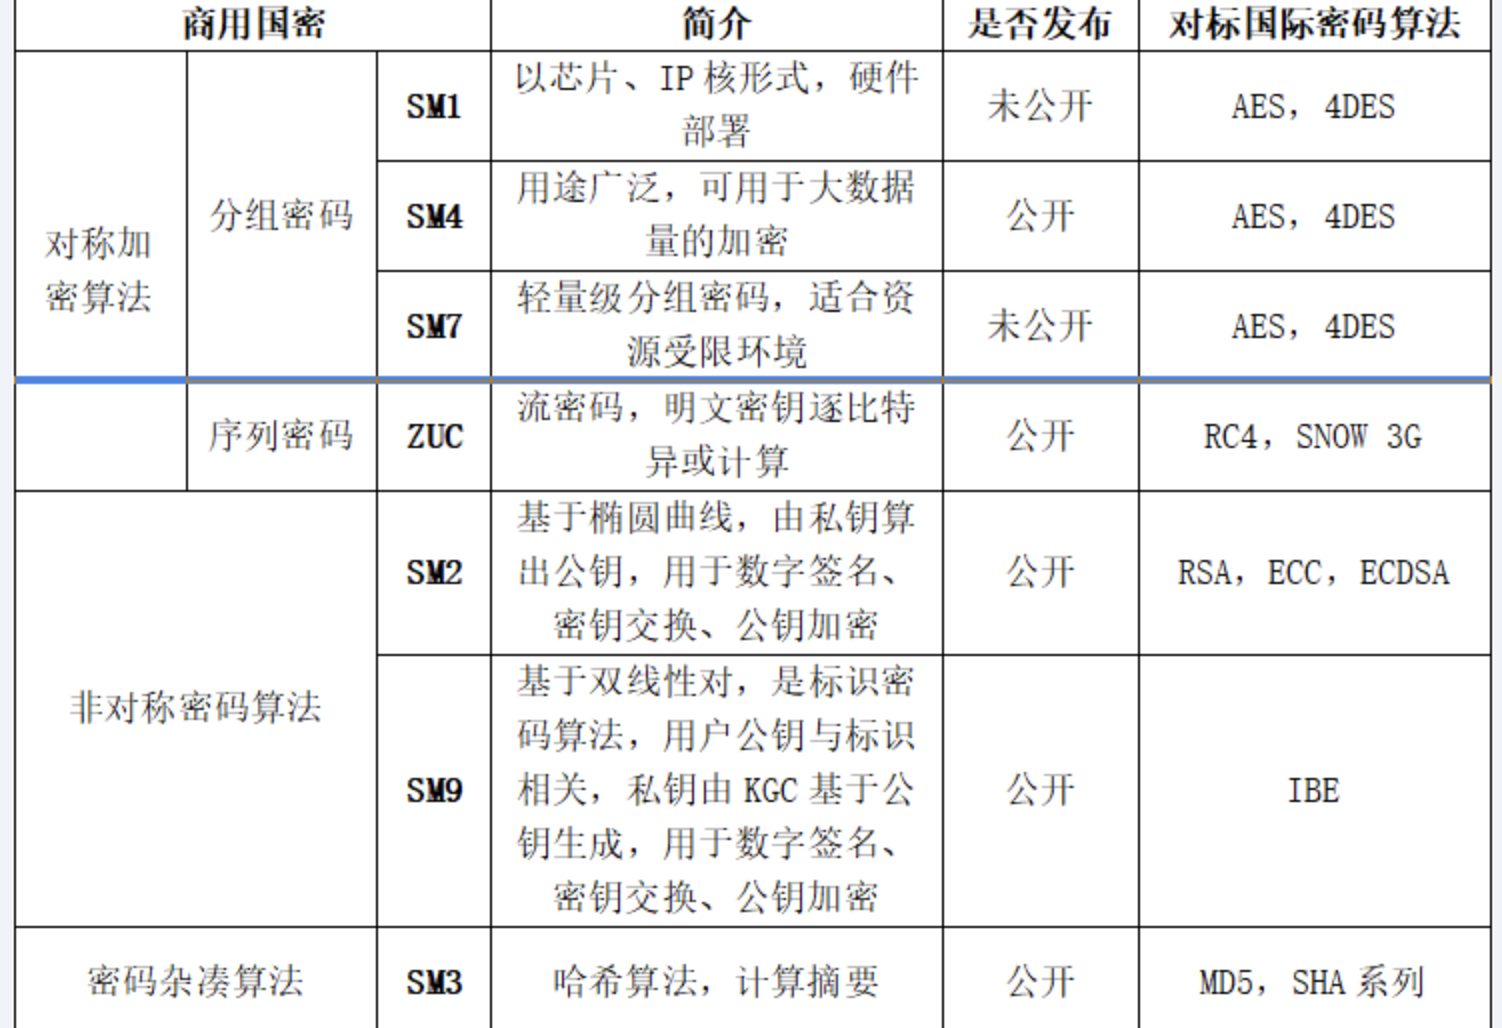
密码分为: 核心密码、普通密码、商用密码。
核心密码(绝密级)、普通密码(机密级) 用于保护国家秘密信息。
商用密码保护不属于国家秘密的信息,公民、法人、其他组织可以使用。


Biba

禁止搬运在线运行的网络设备属于–防震


 透明代理
透明代理

 握手协议
握手协议

 操作系统不属于行业漏洞


电子证据


注册表在system32/config目录下

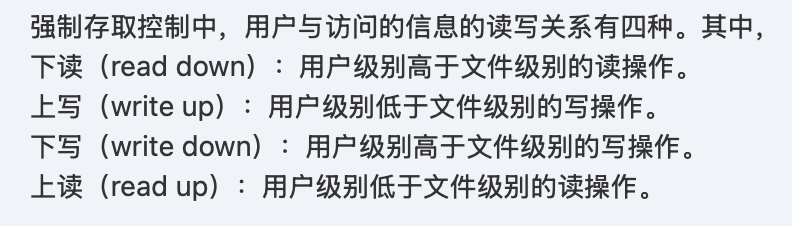 用户高:向下;用户低:向上
系统安全

三同步:同步设计、同步建设、同步运行
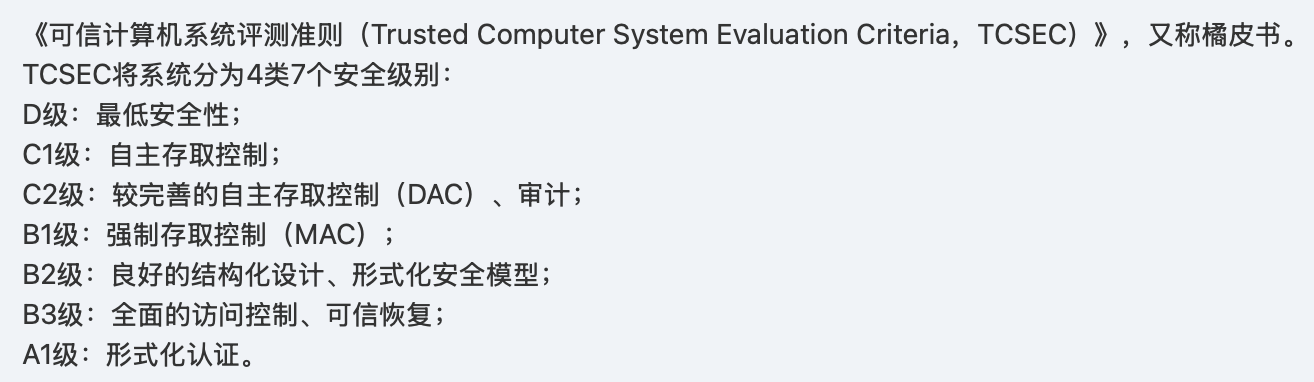 TCSEC
TCSEC


表达攻击,干扰水印的存在:
鲁棒性攻击,减少/消除水印:

 容错系统工作
 形式化验证最精确
 隐蔽通道
隐蔽通道


 云计算–端、管、云
 Android
工控系统追求:可用性–完整性–保密性
传统IT:保密性–完整性–可用性

 有关“风险”
 设置账户权限
采用密码技术
账户安全增强:

 机房的组成
机房的组成
国际认证协议:
SELinux:
工控安全: 工控系统固件漏洞
应用安全
模糊测试:
电力工控面临的主要威胁不包括:设备损耗
内容安全策略:
业务连续性管理框架:

重要信息系统灾难恢复等级:
信息安全产品认证
WPDRRC—六个环节、三大要素(人员、政策、技术)
电子证据特点:高科技性、无形性和易破坏性
COBRA
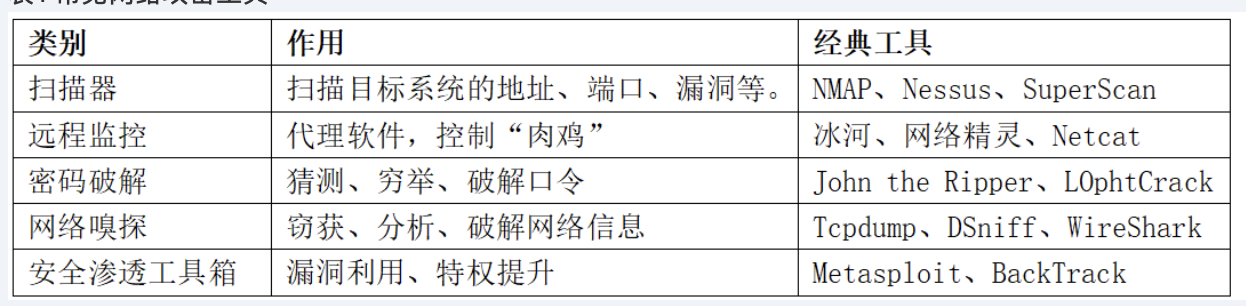
Nessus、Nmap、X-SCAN、AppScan
SSH三协议:传输层、用户认证、连接

X.509
开放系统与封闭系统
OWASP
工具
httpd.conf是Apache的主配置文件
access.conf 文件负责读取文件的基本控制,限制目录执行功能、限制访问目录的权限。
数据库的索引字段用户提高dbms的查找速度,不能加密
强制访问控制:金融、军事
数字水印特点:
代码安全缺陷不包括–功能缺陷:
电子证据特性:
隐私保护技术: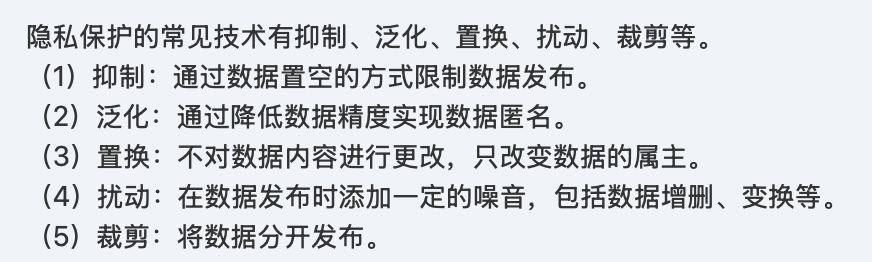
访问控制机制: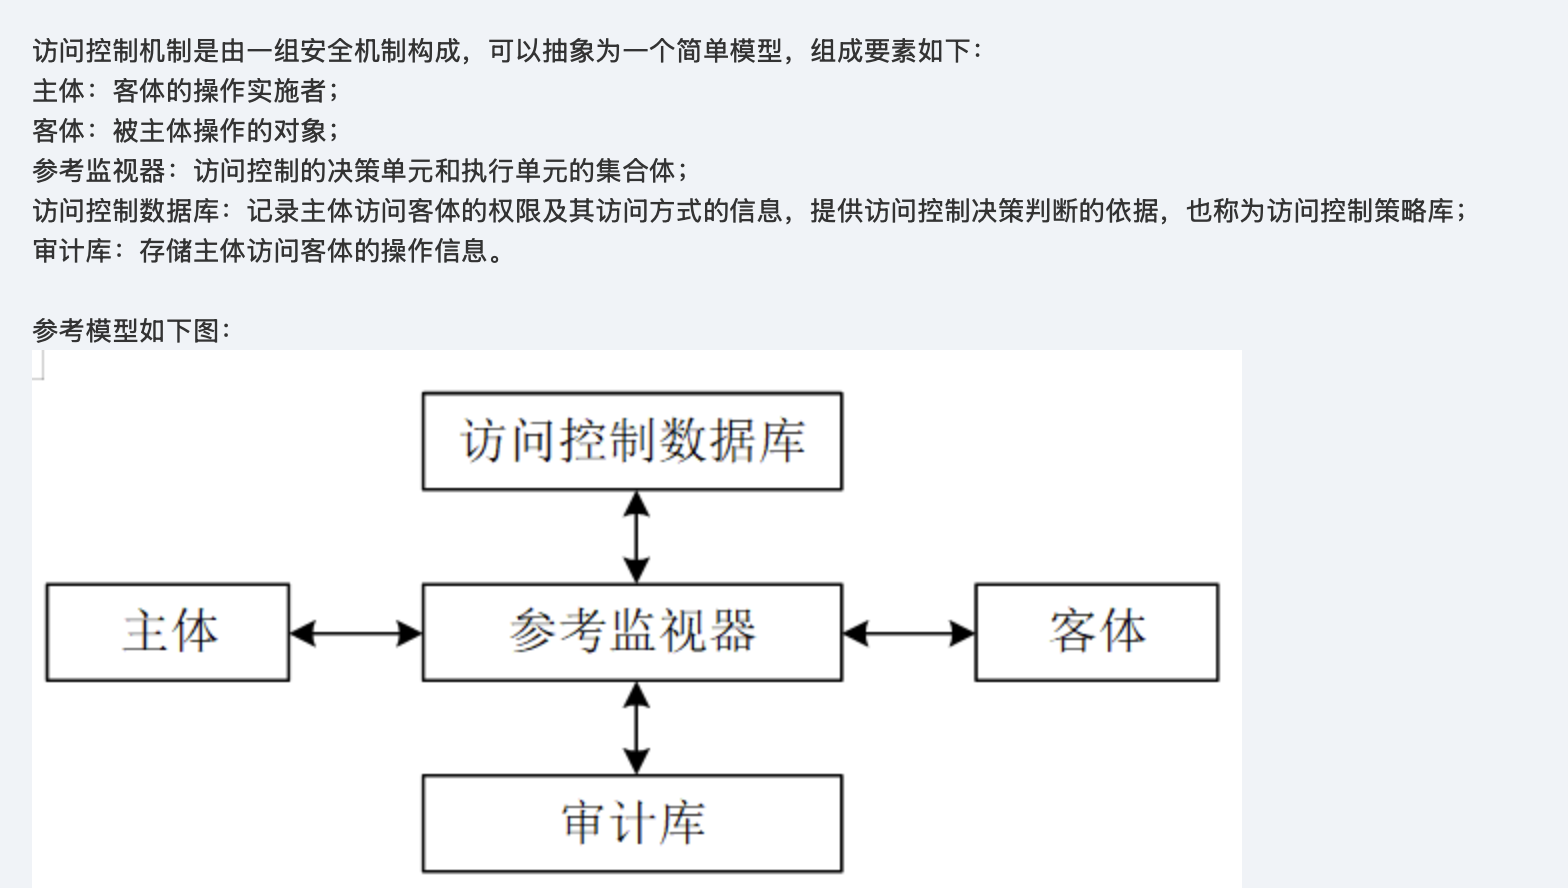
IKE—IPSec
AES:在AES标准规范中,分组长度只能是128位,密钥的长度可以使用128位、192位或者256位。密钥的长度不同,推荐加密轮数也不同,比如AES-128也就是密钥的长度为128位,加密轮数为10轮,AES-192为12轮,AES-256为14轮。
域名–24小时报备
CA提供数字证书的申请、审核、签发、查询、发布以及证书吊销等生命周期的管理服务。RA是证书登记权威机构,辅助CA完成绝大部分 的证书处理功能。
PGP是一种加密软件,应用了多种密码技术,其中密钥管理算法选用RSA、数据加密算法IDEA、完整性检测和数字签名算法,采用了MD5 和RSA以及随机数生成器,PGP将这些密码技术有机集成在一起利用对称和非对称加密算法的各自优点,实现了一个比较完善的密码系 统。
依据《信息安全技术网络安全等级保护测评要求》等技术标准,定期对定级对象的安全等级状况开展等级测评。其中,定级对象的安全保 护等级分为五个,
即第一级(用户自主保护级)、
第二级(系统保护审计级)、
第三级(安全标记保护级)、
第四级(结构化保护级)、
第五级(访问验证保护级)。–提供系统恢复机制
基于行的自主访问控制方法是在每个主体上都附加一个该主体可访问的客体的明细表,根据表中信息的不同又可分成三种形式,即能力 表、前缀表和口令;
基于列的自主访问控制机制是在每个客体上都附加一个可访问它的主体的明细表,它有两种形式,即保护位和访问控制表。
通过VPN技术,企业可以在远程用户、分支部门、合作伙伴之间建立一条安全通道,并得到VPN提供的多种安全服务,从而实现企业网安 全。VPN主要的安全服务有以下3种:
保密性服务:防止传输的信息被监听
完整性服务:防止传输的信息被修改
认证服务:提供用户和设备的访问认证,防止非法接入。
显然,合规性服务不属于VPN安全服务。
根据入侵检测应用对象,常见的产品类型有Web IDS、数据库IDS、工控IDS等。其中Web IDS利用Web网络通信流量或Web访问日志等 信息,检测常见的Web攻击;数据库IDS检测常见的针对数据库的攻击,跨站点脚本攻击不是针对数据库的。
网闸的技术原理是使用一个具有控制功能的开关读写存储设备,通过开关的设置来连接或切 断两个独立主机系统的数据交换,两个独立主机系统与网闸的连接是互斥的,因此,两个独立主机不存在通信的物理连接,而且**主机对网 闸的操作只有“读”和“写”。
计算机信息系统安全保护能力的五个等级审计要求如下:
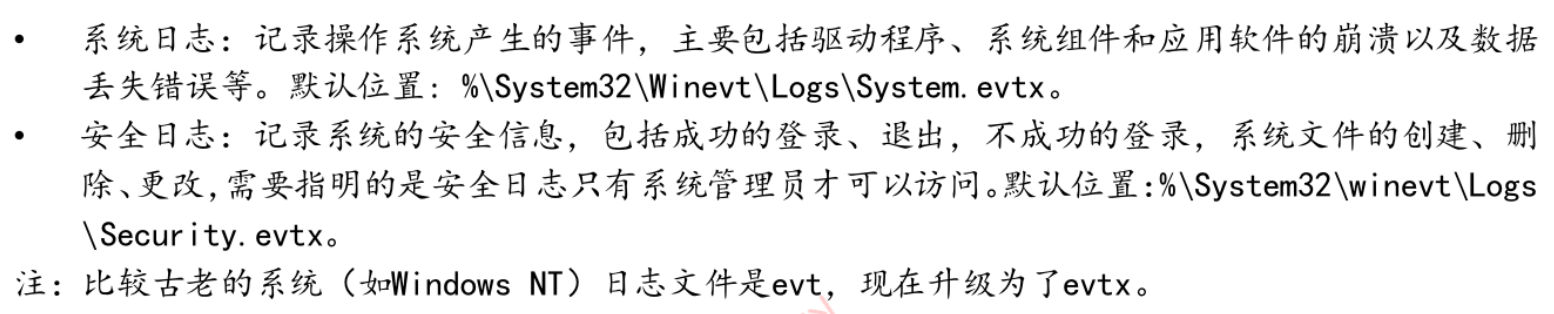
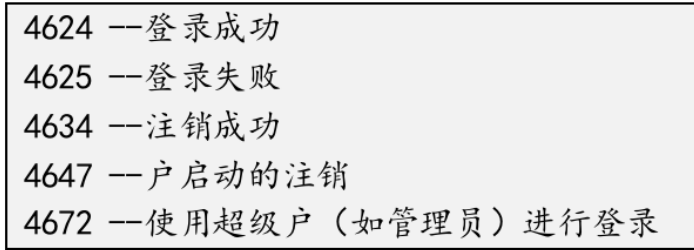
Windows日志有三种类型:
系统日志、应用程序日志和安全日志
Sysevent.evt、Appevent.evt和Secevent.evt
安全日志记录与安全相关的事件,只有系统管理员才可以访问。
依据技术性分类,漏洞分为以下两类:
(1)非技术性安全漏洞:这方面的漏洞来自制度、管理流程、人员、组织结构等。包括网络安全责任主体不明确、网络安全策略不完备、 网络安全操作技能不足、网络安全监督缺失、网络安全特权控制不完备。
(2)技术性安全漏洞:这方面的漏洞来源有设计错误、输入验证错误、缓冲区溢出、意外情况处置错误、访问验证错误、配置错误、竞争 条件、环境错误等。
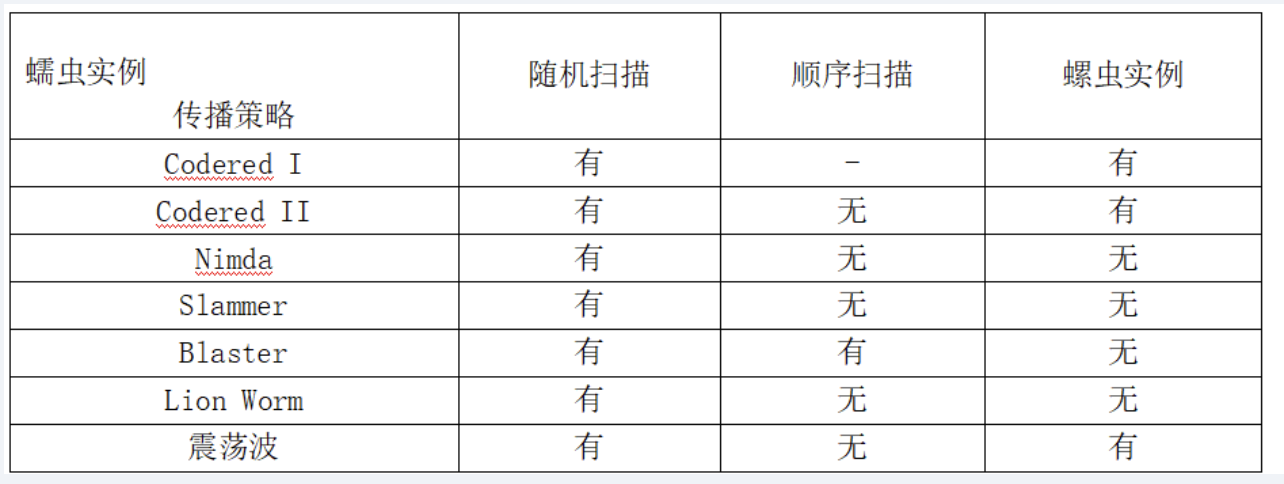
蠕虫扫描:随机、顺序、选择性(螺虫实例)
ICMP风暴和Smurf攻击都是基于网络层ICMP协议的攻击;
UDP风暴是基于传输层UDP的攻击;
SYN Flood攻击通过创建大量“半连接”来 攻击,TCP连接的三次握手中,服务器在发出SYN+ACK应答报文后无法收到客户端的ACK报文(第三次握手无法完成),服务器将等待1 分钟左右才丢弃未完成连接,如果出现大量这样的半连接将消耗大量的资源。
在网络安全测评的实施方式中,安全功能检测,依据网络信息系统的安全目标和设计要求,对信息系统的安全功能实现状况进行评估,检 查安全功能是否满足目标和设计要求。安全功能符合性检测的主要依据有:《信息安全技术信息系统等级保护安全设计技术要求》 (GBT25070-2019)、《信息安全技术信息系统通用安全技术要求》(GBT20271-2016)、网络信息安全最佳实践、网络信息系统项目安 全需求说明书等。
日志文件绝大多数是纯文本文件,每一行就是一个消息。每个消息都由四个域的固定格式组成。时间标签:表示消息发出的日期和时间。 主机名:表示生成消息的计算机的名字。生成消息的子系统的名字:可以是Kernel,表示消息来自内核;或者是进程的名字,表示发出消 息的程序的名字,在方括号里的是进程的PID。消息:即消息的内容。
Oracle系统有超过10个特殊的默认用户账号和密码,密码有些就储存在操作系统中的普通文本文件中,Oracle内部密码就储存在 strXXX.cmd文件中,其中XXX是Oracle系统ID和SID,默认是“ORCL”。这个密码用于数据库启动进程,提供完全访问数据库资源。 Oracle监听进程密码,保存在文件“listener.ora”(保存着所有的Oracle执行密码)中,用于启动和停止Oracle的监听进程。 cmd文件即链接命令文件,以后缀.cmd结尾,用于DSP代码的定位,用户自定义代码存放和加载位置,所以可能用于存储Oracle数据库的 内部密码。
第二代交换机又称为以太网交换机,工作于OSI的数据链路层,称为二层交换机,识别数据中的MAC,并根据MAC地址选择转发。
第一代交换机以集线器为代表,工作在OSI的物理层;
第三代交换机通俗地称为三层交换机,工作在OSI的网络层;
第四代交换机在第三代 交换机的基础上增加了业务功能,比如防火墙、负载均衡、IPS等;
第五代交换机通常支持软件定义网络SDN,具有强大的QoS能力。
为避免攻击者利用Read-onlySNMP或ReadWrite SNMP对网络设备进行危害操作,网络设备提供了SNMP访问安全控制措施,包括 SNMP访问认证、限制SNMP访问的IP地址、关闭SNMP访问。
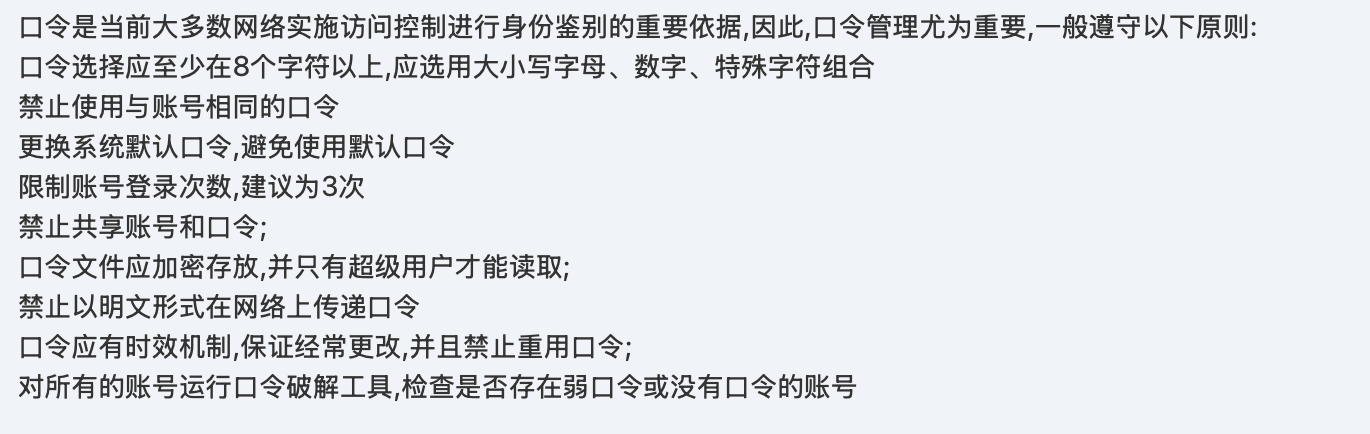
口令是系统中认证用户的主要手段,系统安装时默认的口令最小长度通常为5,但为保证口令不易被猜测攻击,可增加口令的最小长度至少为 8。为此,需修改文件etc/login.defs中的参数PASS MIN LEN。同时应限制口令的使用时间,保证定期更换口令,建议修改参数PASS MIN DAYS。
setenforce 1可临时启用 SELinux 的强制模式(Enforcing),让系统强制实施 SELinux 策略。
cmp–文件比较。
cmp -s file1.txt file2.txt
echo $? # 查看上一条命令的退出状态码
状态码0:文件相同;状态码1:文件不同
arp–查看和管理本地的arp缓存表
机房安全等级分A、B、C三级,机房标准为A,较大损害为B,机房选址应在二楼。
7月2日,网络安全审查办公室发布关于对“滴滴出行”启动网络安全审查的公告。公告原文如下: 为防范国家数据安全风险,维护国家安全,保障公共利益,依据《中华人民共和国国家安全法》《中华人民共和国网络安全法》,网络安 全审查办公室按照《网络安全审查办法》,对“滴滴出行”实施网络安全审查。为配合网络安全审查工作,防范风险扩大,审查期间“滴滴出 行”停止新用户注册。 7月5日,网络安全审查办公室发布关于对“运满满”“货车帮”“BOSS直聘”启动网络安全审查的公告。公告原文如下: 为防范国家数据安全风险,维护国家安全,保障公共利益,依据《中华人民共和国国家安全法》《中华人民共和国网络安全法》,网络安 全审查办公室按照《网络安全审查办法》,对“运满满”“货车帮”“BOSS直聘”实施网络安全审查。为配合网络安全审查工作,防范风险扩 大,审查期间“运满满”“货车帮”“BOSS直聘”停止新用户注册。
金丝雀(Canary)这一名称来源于早先英国的探测技术。英国矿工下井前会带一只金丝雀,金丝雀对毒气敏感,如果井下有有毒气体,则 会停止鸣叫甚至死亡,从而矿工们得到预警。 Canary技术属于缓解缓冲溢的有效手段,该技术插入一个值在堆栈溢出发生的高危区域的低地址部分。通过检测该值是否改变,来判断堆 栈或者缓冲区是否出现溢出。这种方式,增加了堆栈溢出攻击的难度,而且几乎不消耗资源,属于操作系统保护的常用手段。堆栈保护。
TCP SYN扫描又称“半打开扫描(Half-open Scanning)”,当向目标主机发送SYN连 接,如果收到一个来自目标主机的SYN/ACK应答,那么可以推断目标主机的该端口开放。如果收到一个RSTACK则认为目标主机的该端口 未开放。
在移动应用App程序插入无关代码属于代码混淆技术,用于增加阅读代码的难度,是防反编译的一种手段。
PDRR(防护-检测-恢复-响应)模型中,数据备份对应环节是恢复。
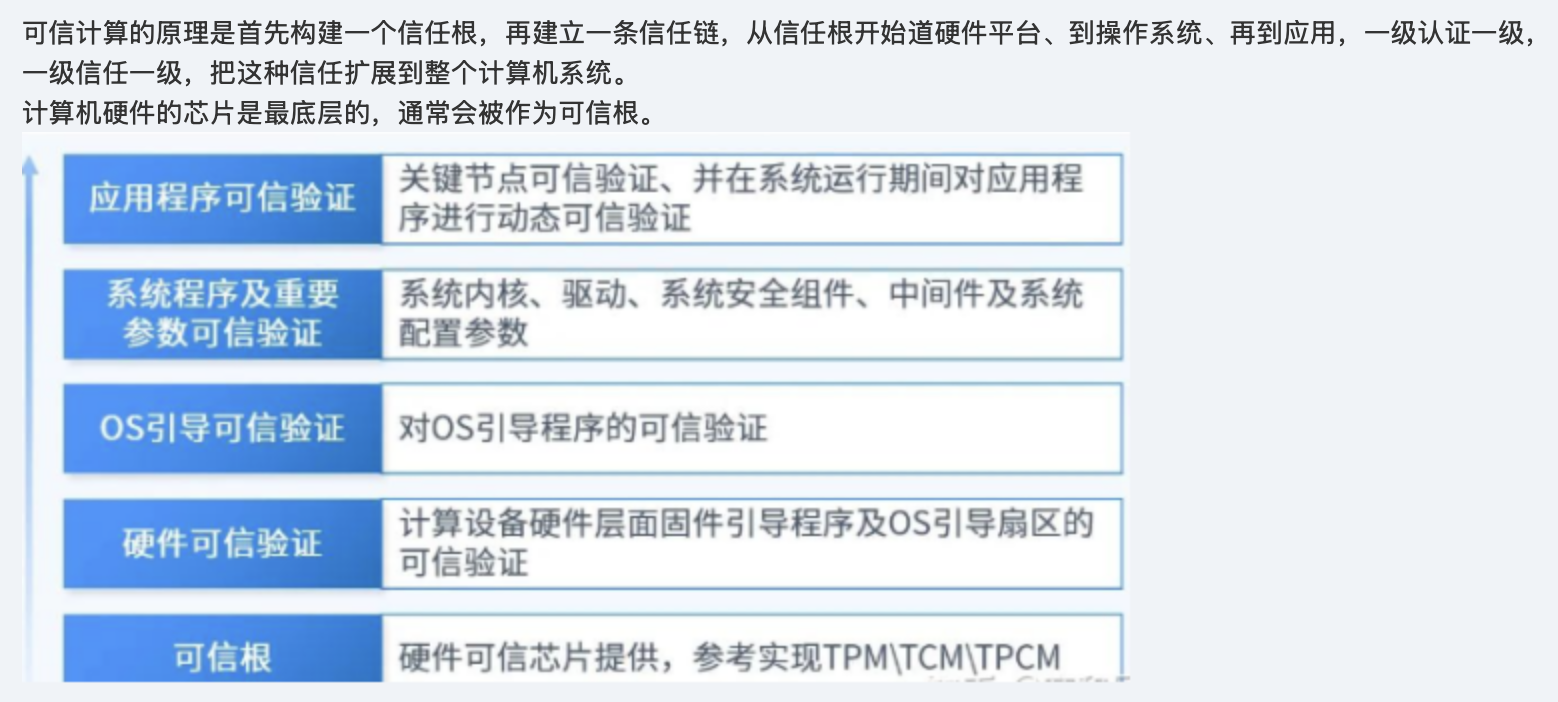
等保2.0第四级要求:所有计算节点都应基于可信根实现开机到操作系统启动,再到应用程序启动的可信验证,并在应用程序的所有执行环 节对其执行环境进行可信验证,主动抵御病毒入侵行为,同时验证结果,进行动态关联感知,形成实时的态势。
三级增加应用程序的关键执行环节进行动态可信验证;
四级增加应用程序的所有执行环节进行动态可信验证。
认证一般由标识和鉴别两部分组成。
(1)标识(Identification):实体(如设备、人员、服务、数据等)唯一的、可辨识的身份标志。这些标志可以是IP地址、网卡地址、通讯运营商信息等。
(2)鉴别(Authentication):利用技术(如口令、数字证实、签名、生物特征等),识别并验证实体属性的真实性和有效性。
Kerberos系统中的应用服务器负责为用户提供服务。
操作系统访问控制是针对计算机系统资源而采取的访问安全措施。操作系统访问控制的具体措施有文件读写、进程、内存等访问控制。
Web应用防火墙可以防止SQL注入、xss攻击、恶意文件上传、远程命令执行、文件包含、恶意扫描拦截等;可以发现并拦截恶意的Web 代码;可防止网站挂马、后门上传拦截等。所以说Web应用防火墙只针对80、443端口的表述是错误的。
基于网络的入侵检测系统(NIDS)可以检测到的攻击有:同步风暴、分布式拒绝服务攻击、网络扫描、缓冲区溢出、协议攻击、流量异常、 非法网络访问等。
基于主机型入侵检测系统(HIDS)可以检测:针对主机的端口和漏洞扫描;重复登录失败;拒绝服务;系统账号变动、重启、服务停止、注册表修改、文件和目录完整性变化等。
FTP称为文件传输协议,文件传输审计主要针对FTP协议,从FTP网络流量数据提取信息。
引导区病毒是通过感染磁盘引导扇区进行传播的病毒。
常见的引导区病毒有Boot.WYX、磁盘杀手、AntiExe病毒等。
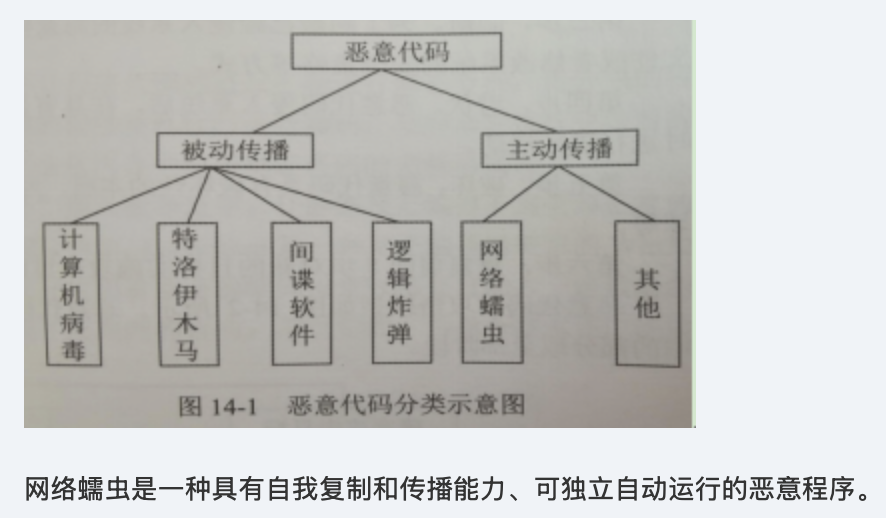
蠕虫的具体组成如下:
(1)探测模块:探测目标主机的脆弱性,确定攻击、渗透方式。
(2)传播模块:复制并传播蠕虫。
(3)蠕虫引擎模块:扫描并收集目标网络信息,如IP地址、操作系统版本等。
(4)负载模块:实现蠕虫内部功能的伪代码。
网络安全取证步骤如下:
(1)取证现场保护。保护受害系统或设备的完整性,防止证据丢失。
(2)证据识别。识别可获取的证据信息。
(3)传输证据。传输证据到取证设备。
(4)保存证据。存储证据,并确保存储的数据与原始数据一致。
(5)分析证据。针对证据进行分析,重现攻击过程。
(6) 提交证据。向法院、律师提交证据。
防火墻的网络地址转换(NAT)技术主要是为了解决公开地址不足而出现的,当内部某一个用 户访问外网时,防火墙动态地从地址集中选择一个未分配的地址分配给该用户,该用户即可使 用这个合法地址进行通信。在实现 NAT 的方式中,把内部地址映射到外部网络的一个IP地址 的不同端口上的方式属于PAT。
隐私保护技术是针对个人信息安全保护的重要措施,常见的隐私保护技术有泛化、抑制、置换、 裁剪、扰动等。其中改变数据属主的方式被称为置换。
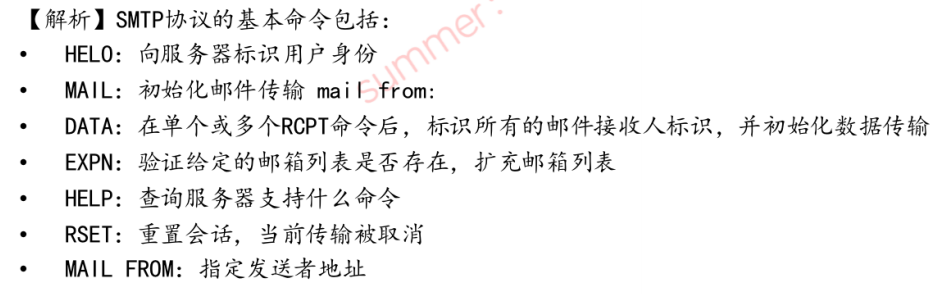
WinPC 复用25端口
案例分析题
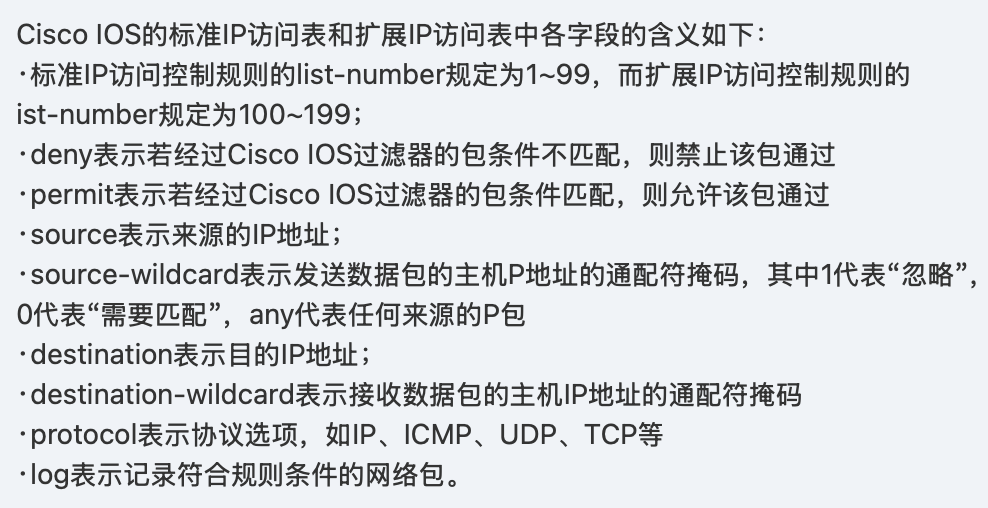
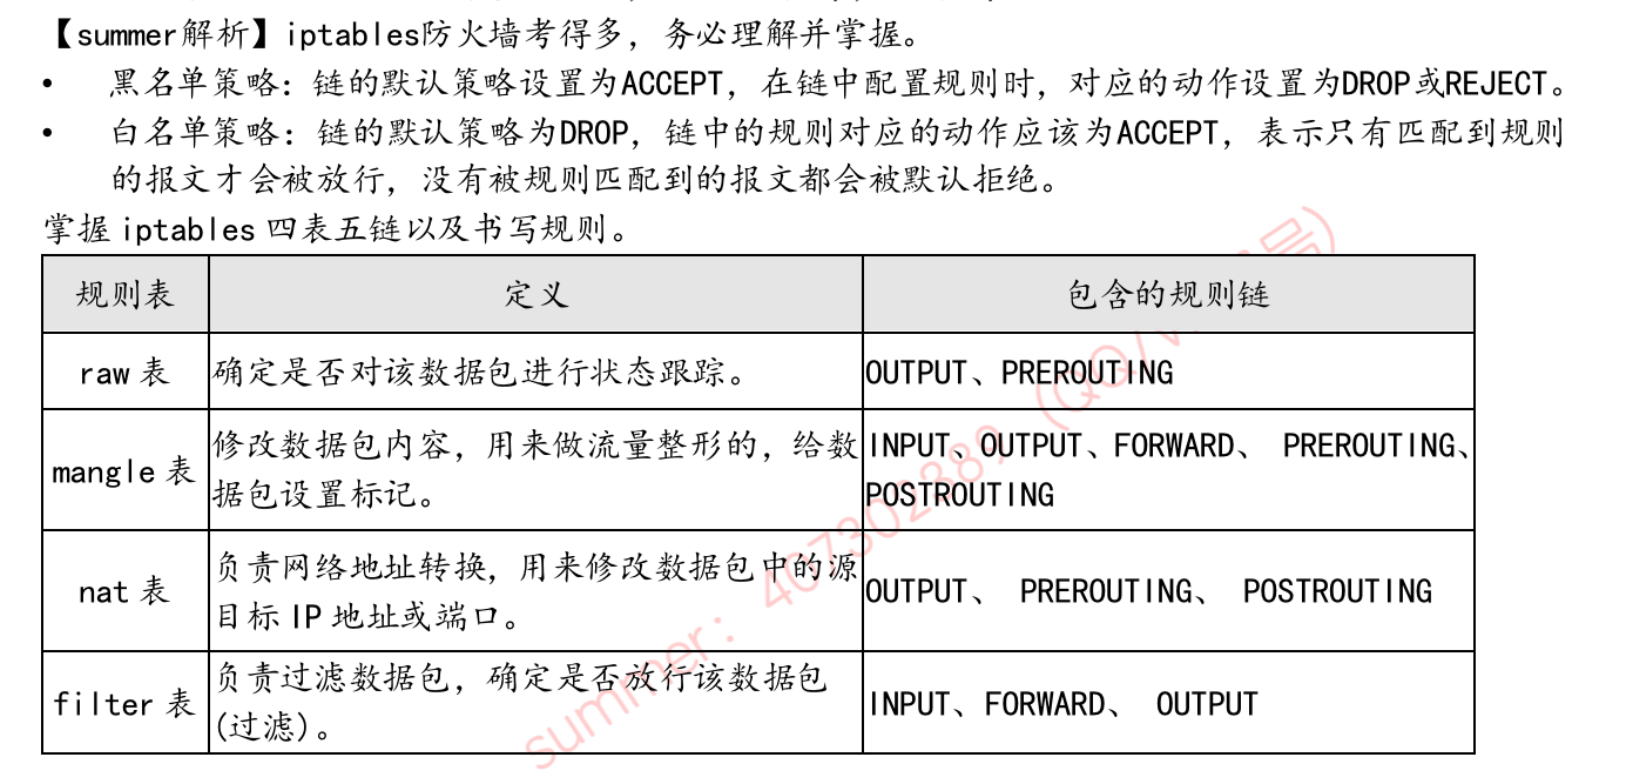
iptables
iptables -A INPUT --dport 80 -p tcp -j Accept iptables -A INPUT –sport 53 –dspot 1024:65535 -p UDP -j Accept
iptables -A INPUT --dport 20:23,53,80,110 -p tcp -m multiport -j Accept
Linux知识
创建软连接 ln -s /dev/shm shm (-s是软链接,没有就是硬链接)
查找失效的链接文件 find /home xtype l
删除实效的 find /home xtype l -delete
系统日志文件路径 var/log/secure
etc/ssh/ssh_config
>>表追加
systemctl restart sshd (start/stop/restart)
要远程登录的需要使用 /bin/bash 的shell (sh zsh tcsh也行)

Windows知识

事件查看器 eventvwr.msc
3389是rdp端口
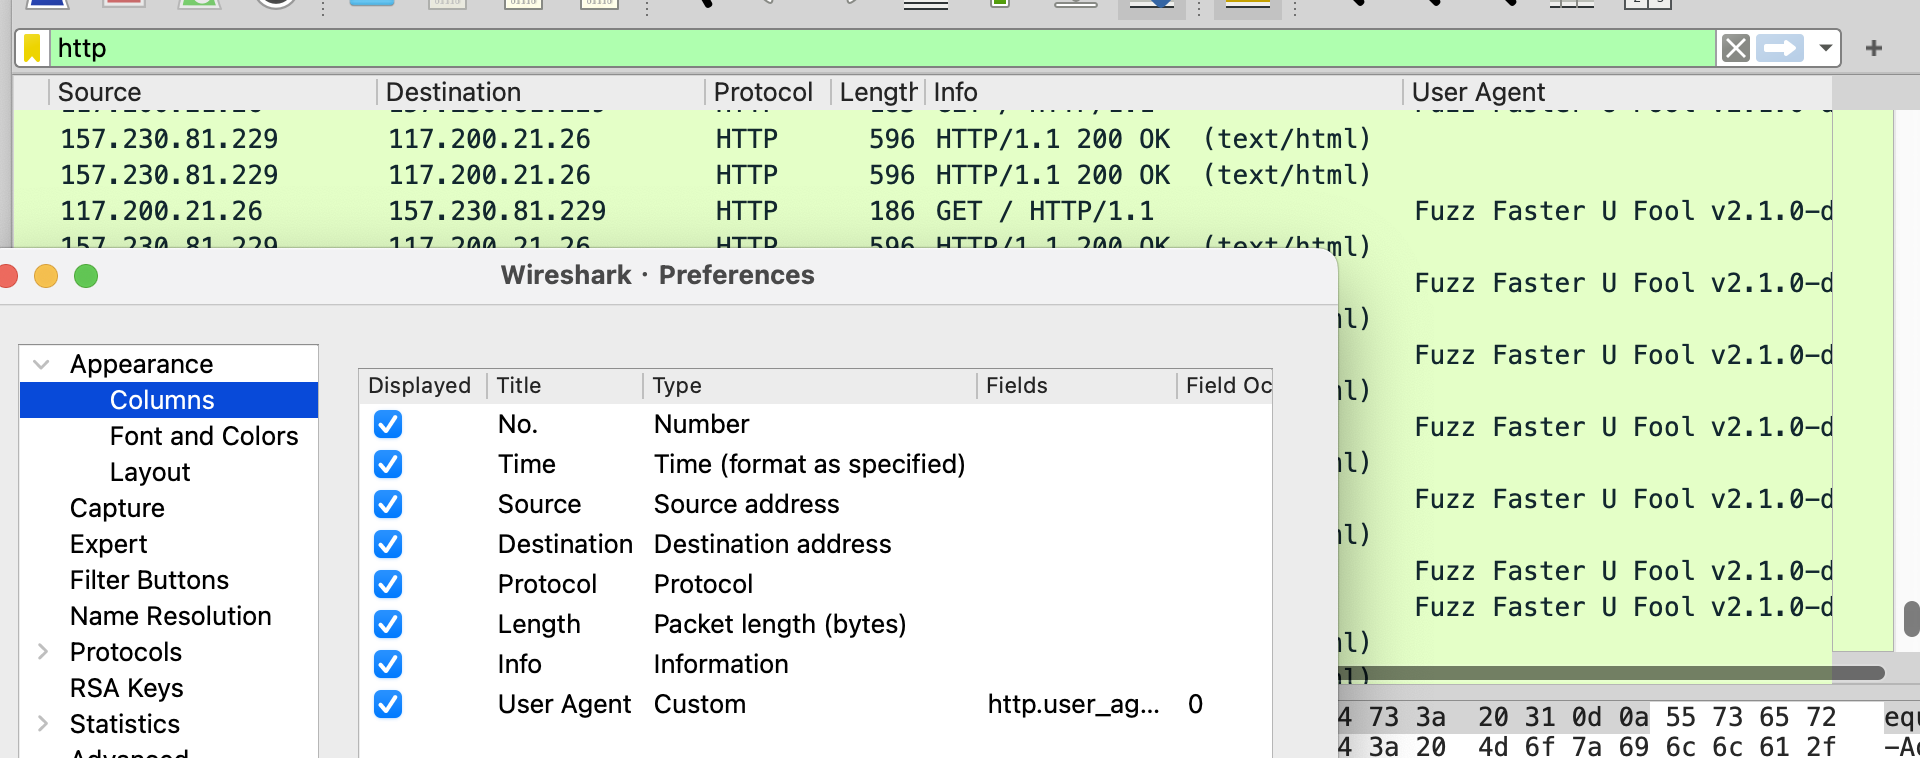
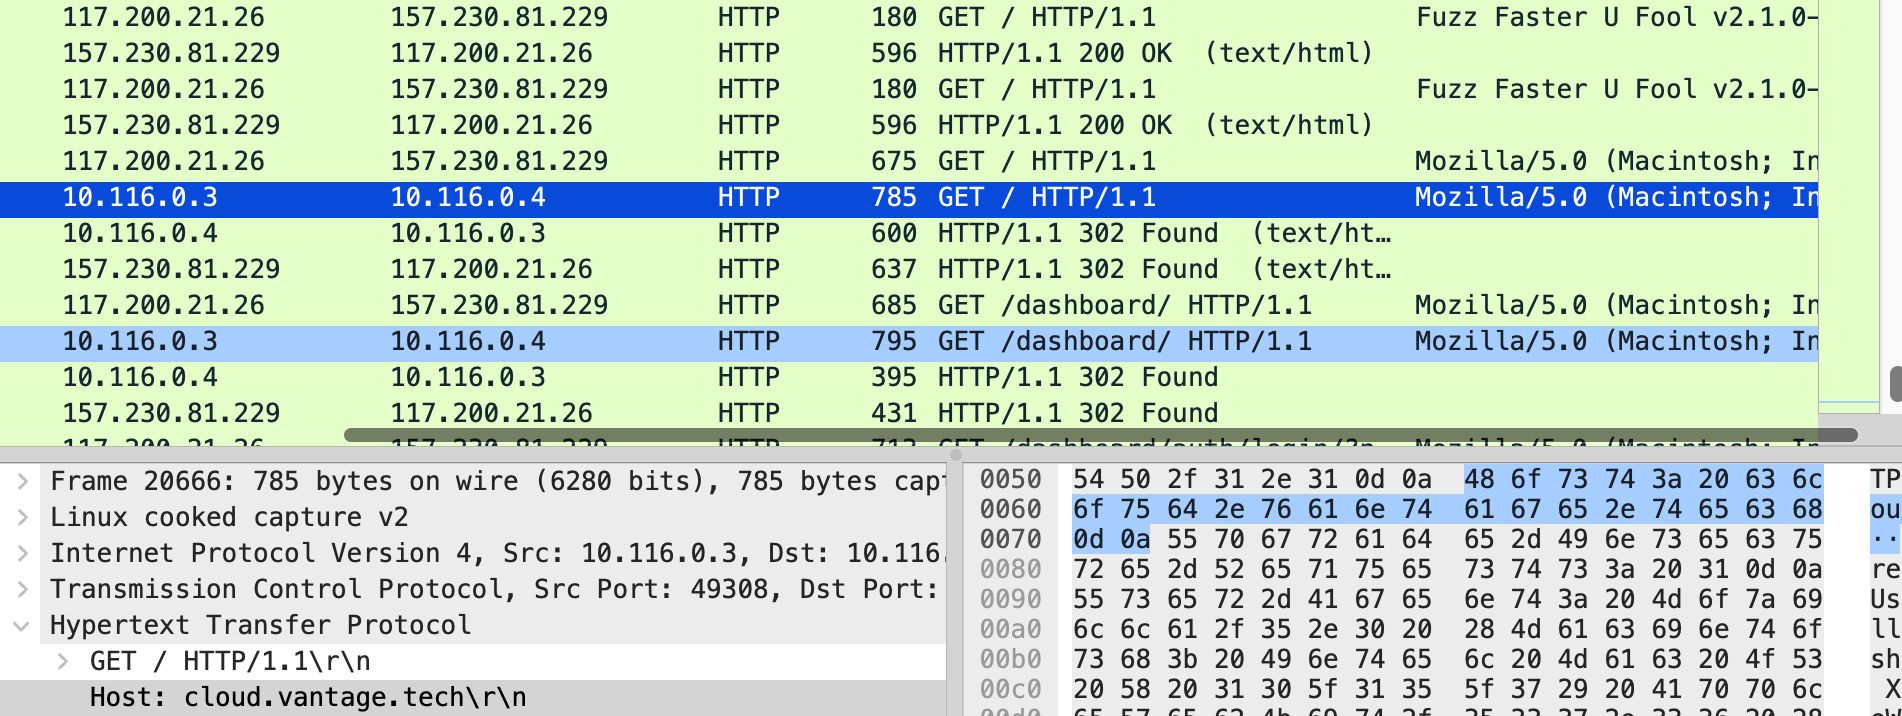
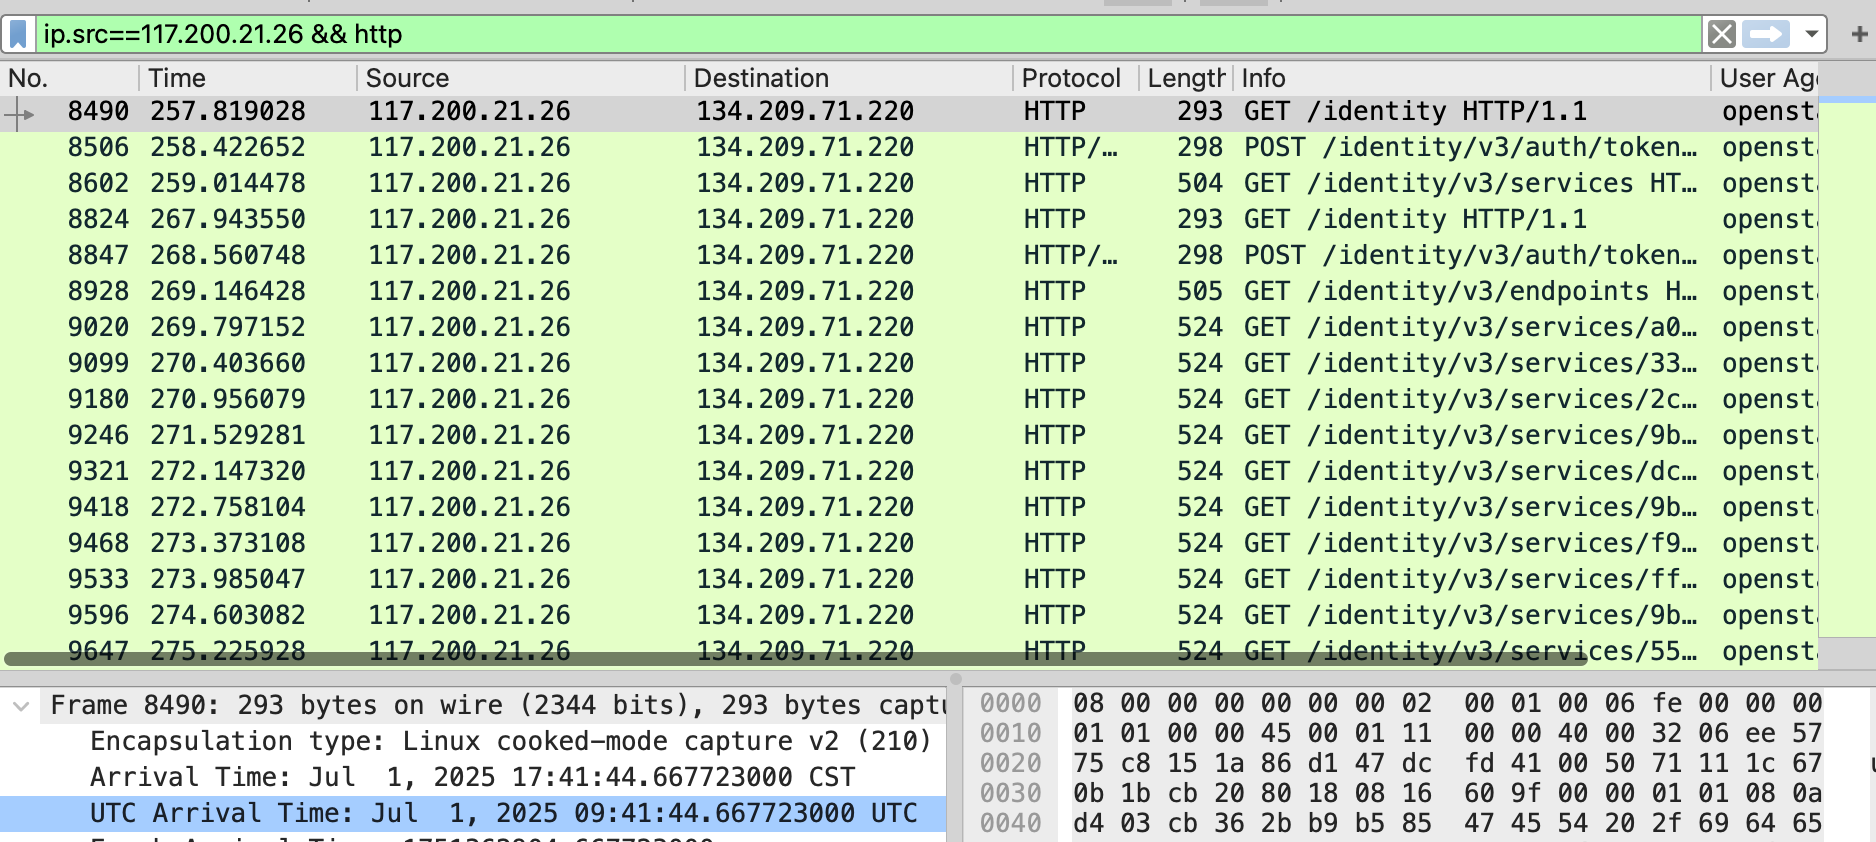
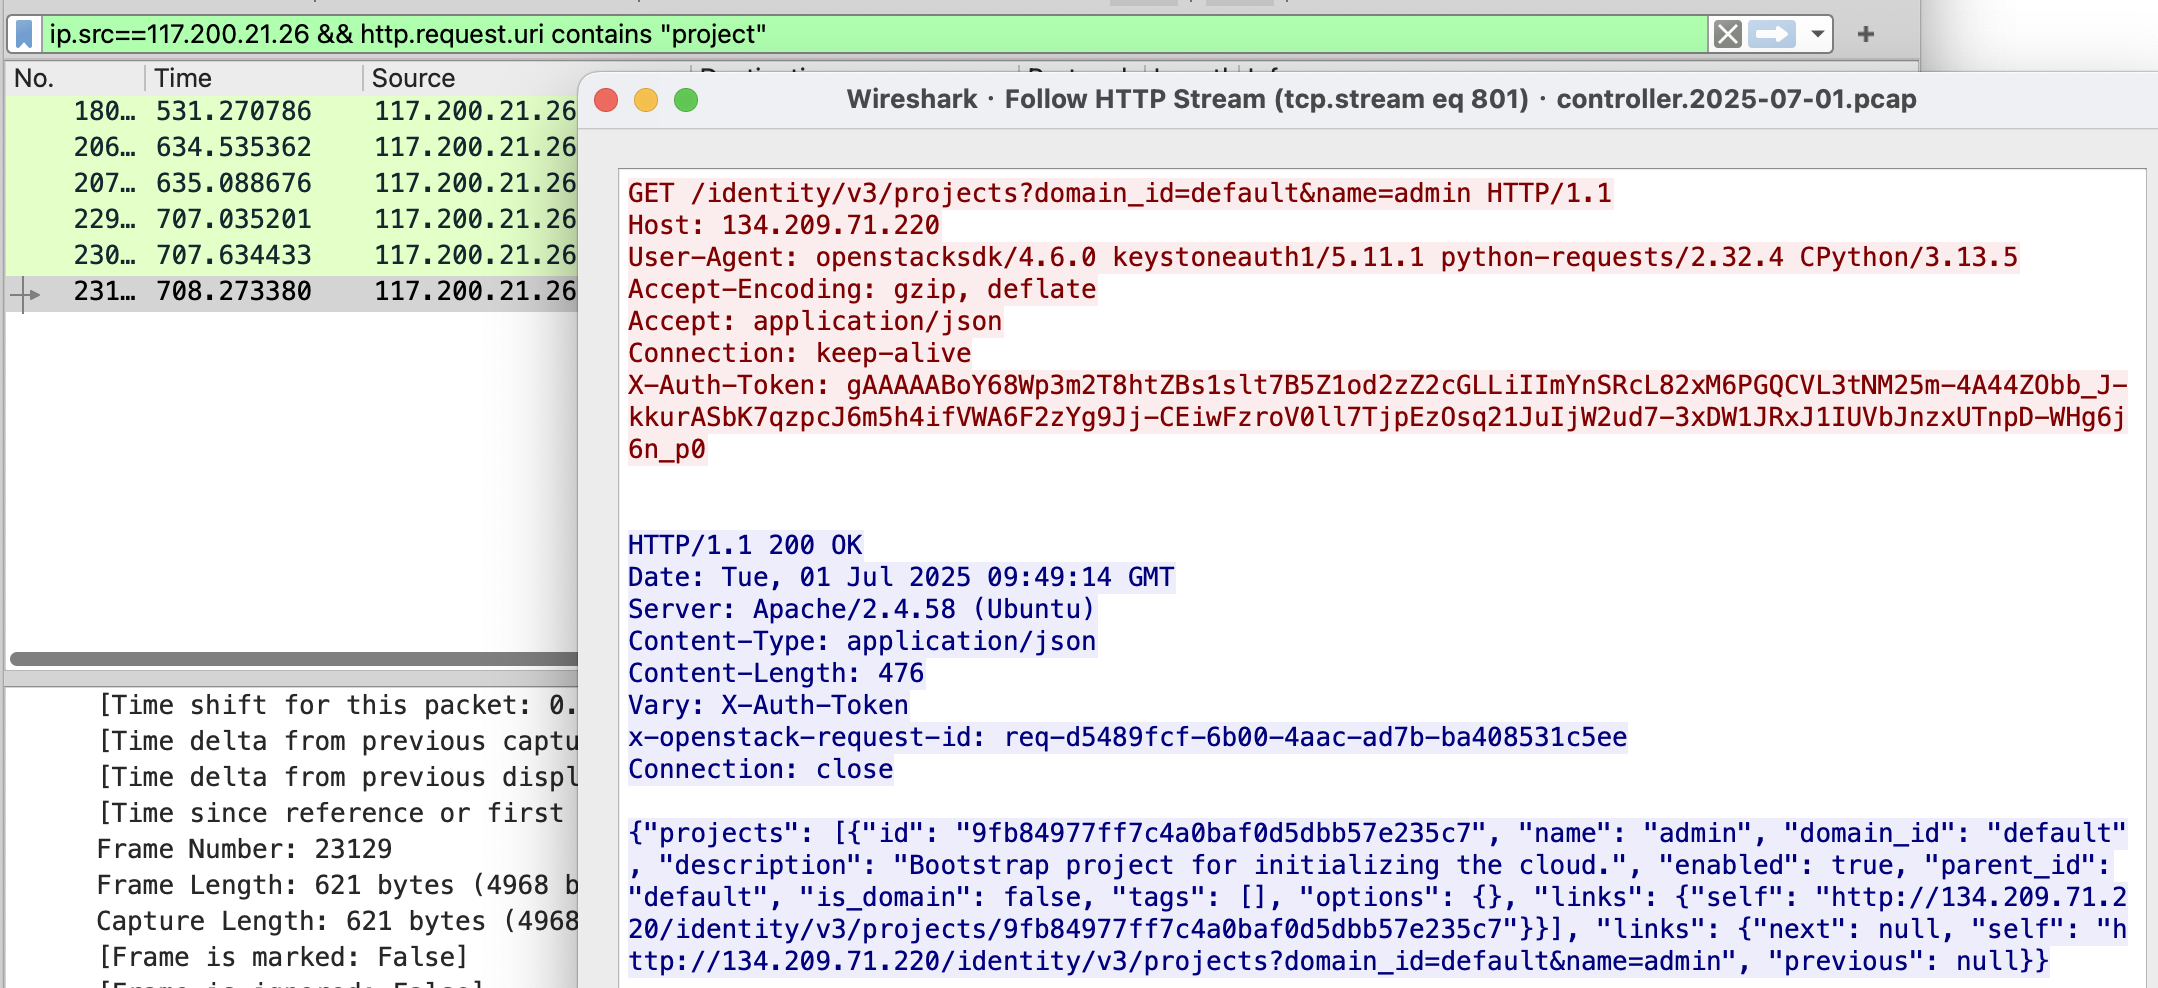
Wireshark过滤:tcp.port == 3389 ip.addr == 192.168.66.1
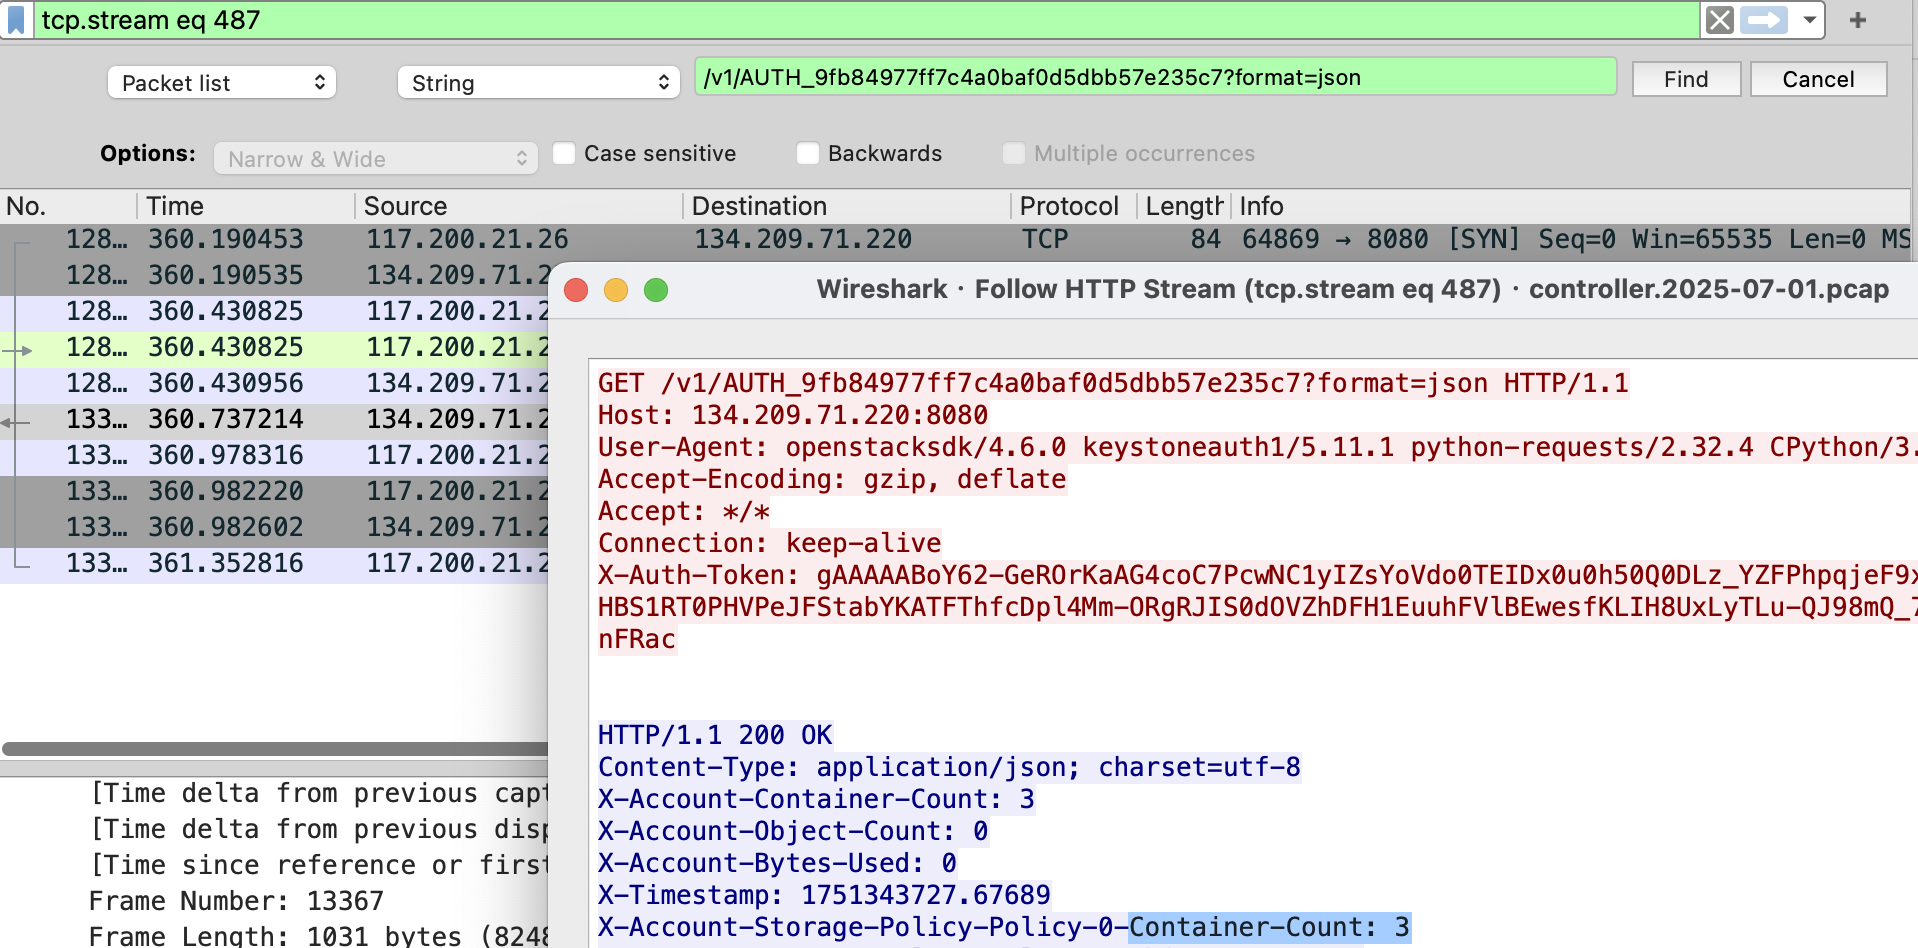
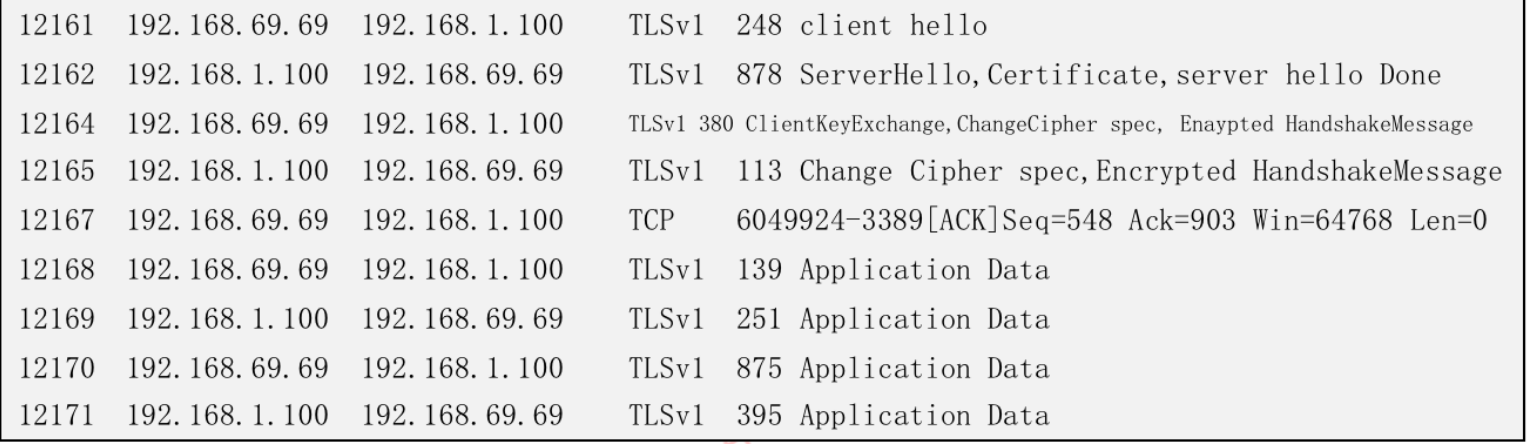 12162开始交换密钥,12168开始传递加密数据
ICMP协议受害者收到Echo reply数据包
RSA
e * d=mod &(n) 求公钥d
私钥Ke,公钥Kd,M是明文,C是密文
C =Me mod n
M =Cd mod n
消息(明文)m < n
不可以直接使用RSA数字签名,首先因为消息太大,时间需要长,并且加密后n太大了,其次无法验证完整性,完整性需要hash验证
RSA签名体制可以实现三个基本安全目标:完整性、真实性、不可否认性
其他
政府网站不低于三级,每年检查
netstat -a 显示所有连接和监听端口
netstat -b 显示对应的可执行文件
Snort属于基于网络型的误用检测系统。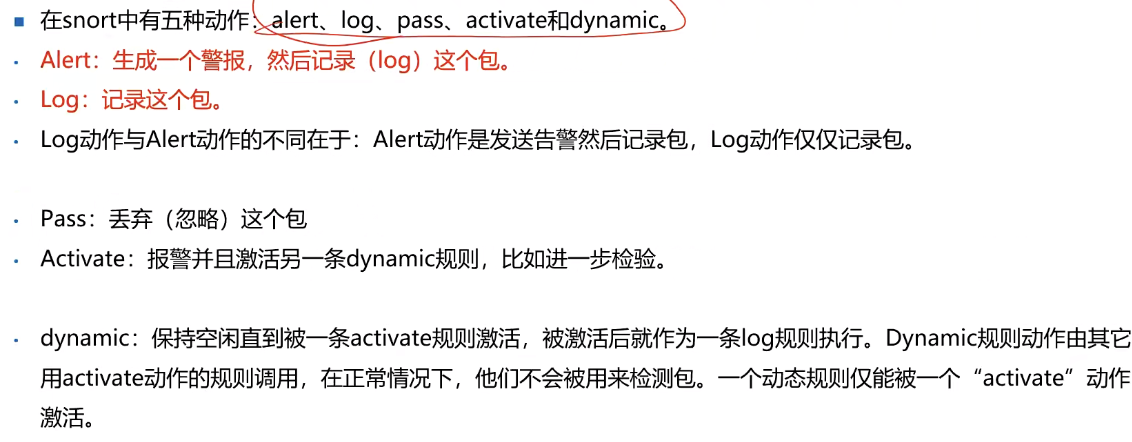
安全通信方式:ssh 和stelnet(secure telnet)
CC攻击
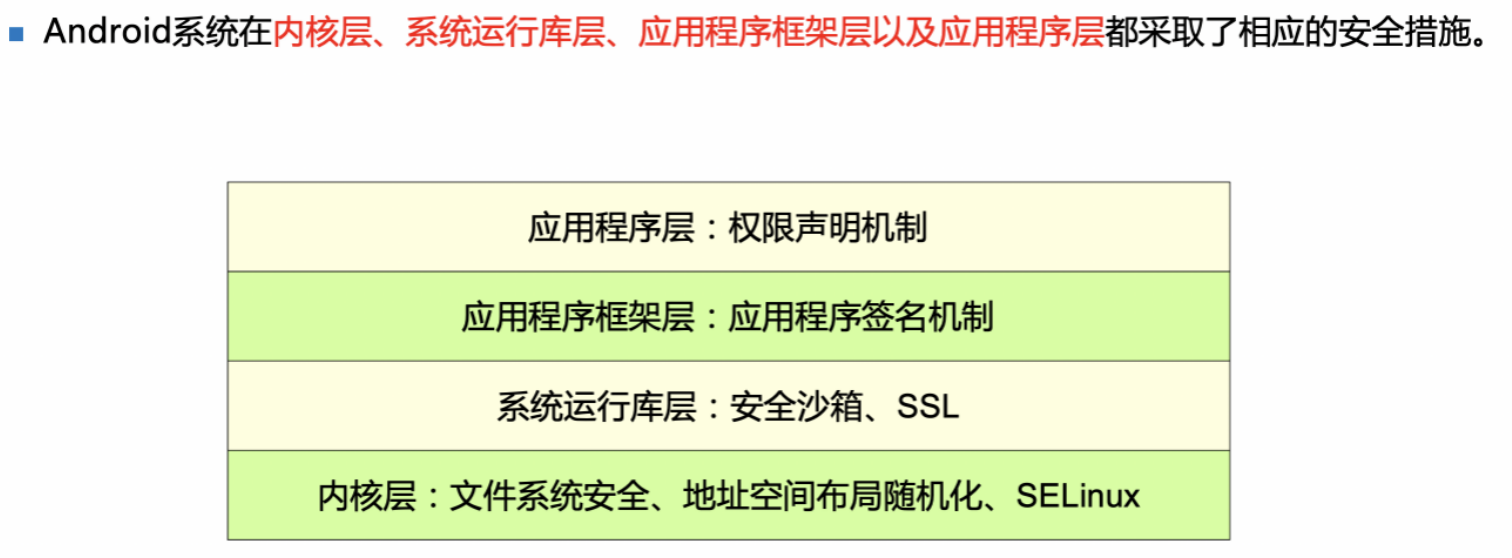
安卓四大组件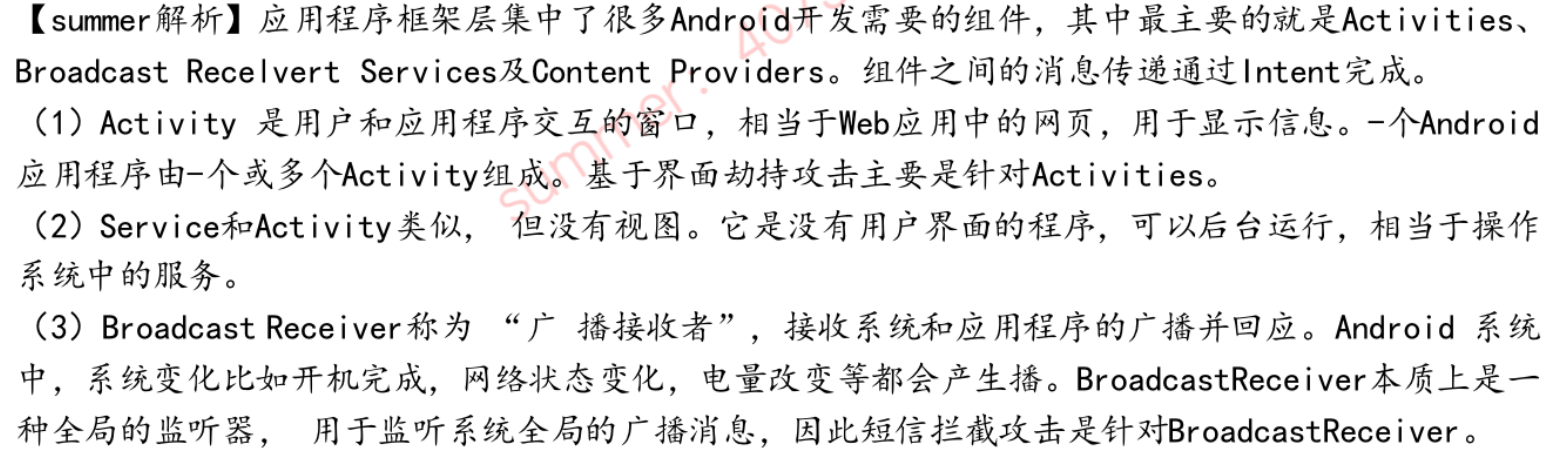

替代 和 置换 对应香农发表的论文提到的 混乱 和 扩散 技术
跨站伪造请求攻击–认证服务
明文传输漏洞–数据加密
Sumurf攻击(Dos)–可用性
攻击进行追踪溯源–审计服务
签名伪造攻击–抗否认性
软件被植入木马–数据完整性
BLP模型–防止非授权信息的扩散,只能保障机密性,不能保障完整性
简单安全特性:读访问,主体 > 客体全部范畴,只能向下读
*特性:写访问,客体 > 主体全部范畴,只能向上写
Biba模型–防止非授权修改,保障完整性
简单安全特性:主体 > 客体全部范畴,不能向下读
*特性 :主体 < 客体 ,不能向上写
调用特性:主体完整性 < 另一个主体 ,不能调用另一个主体
C语言
缓冲区溢出,C语言数组特性:不对数组越界进行检查
栈(stack):
编译器自动分配自动管理,内存连续,保存函数值和局部变量,内存空间从高到低分配。
堆(heap) :
人为分配,通过malloc或new,需要手动释放,或者程序结束统一回收。内存空间不连续,从低到高分配。
模糊测试相当于黑盒测试
]]>